Can You Tarp a Whole Roof?
A tarp is a simple, affordable way to protect your home from serious water damage. However, you should always have professional roofers do a thorough inspection and perform the necessary repairs before laying a tarp on your damaged roof.
To tarp your roof, you’ll need an appropriately-sized tarp and 2×4 wooden boards to anchor the tarp. Also, account for any rooftop features like chimneys and plumbing vents that might block the tarp.
Roof Damage
It isn’t a good idea to attempt a roof repair or tarping project on your own. It’s not just dangerous, but it could lead to even worse damage that requires more extensive and expensive repairs. In addition to that, it could also be a health hazard for you and your family, as well as encourage mold and fungus growth inside the home. In a worst-case scenario, it may cause electrical fires that can threaten the safety of your entire household.
The first step is determining the extent of your roof damage. Your roofers may survey the roof from a ladder, wear a harness and inspect it physically or use a drone to get a closer look at the problem areas. Once they have a clearer picture, they will take measurements of the size of the damaged area and determine how large of a tarp is needed to cover it.
Once the tarp is laid, it is important to anchor it with plywood boards on either side and to ensure that all gaps and openings are closed with high-quality butyl tape. It is also essential to cut holes for any roof features, such as chimneys, plumbing vents and skylights. It would be a safety hazard to leave these features covered, and most insurance companies will require that they are removed before the tarp is put back on.
In the final steps, roofers will remove any debris from the roof, including shingle fragments and nails that could clog gutters or interfere with proper water flow. They will then re-secure the tarp with any loose edges or corners and nail the plywood boards down. They will also replace the shingles as needed.
It is important to note that a tarp will only provide temporary protection from severe weather conditions. Ultimately, the only permanent solution is to have your roof repaired as soon as possible. It is vital that you contact New Port Richey Roofers as soon as you notice damage or suspect a leak. They will be able to provide you with an estimate and schedule a repair time as soon as possible.
Roof Leaks
Before tarping a whole roof, it is essential to assess the extent of the damage. This can be done from the safety of a ladder or with a drone if your roof is too dangerous to walk on. In addition to the obvious damage, it’s important to note where water leaks are originating from on the roof so that these areas can be repaired during your roof repair.
Once you know the extent of the damage, you will need to determine how large a tarp to purchase at the hardware store. It is possible to get a good idea of how much tarp you need by using a tape measure on your roof as you walk around. However, it is essential to account for alcoves and nooks and crannies in your roof when measuring to ensure that the tarp you buy will cover everything.
Getting on your roof to do this can be dangerous, especially if the damage has caused a collapsed area. It is best to contact a professional roofer to survey the damage from the ground or by using a drone. They will be able to give you an accurate estimate for the repairs that will need to be made, and they can also schedule the job with your insurance company if needed.
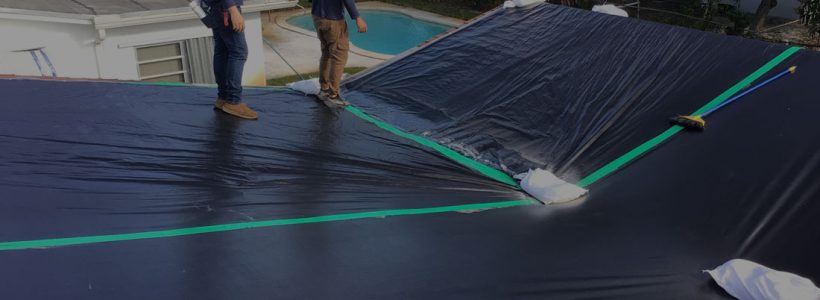
When you are ready to lay your tarp, it is best to have an assistant help you position it over the damaged area of the roof. Make sure that you have enough tarp to allow one end to hang four feet over the peak of your roof and another foot or more above the damaged area. You should also consider any features that stick out of the roof such as chimneys or plumbing vents when calculating your tarp size. It may be necessary to cut holes for these features so that the tarp doesn’t block them, which can cause a fire hazard.
After positioning the tarp, it is important to create anchors so that it doesn’t blow away during a storm. You can do this by rolling a 2×4 wooden board into the peak side of your tarp and nailing it in place to create a weighted anchor. After this, you can lay several more boards evenly spaced across the tarp and use nails to attach them to both the tarp and the roof. Ensure that the boards are fully sandwiched between the tarp and the roof to prevent any leaks from occurring underneath the tarp.
Weather Conditions
Weather conditions can make or break tarping your roof. It’s best to wait until after severe storms pass and the weather calms down before attempting to lay a tarp over your roof. In addition to weather, other factors can include whether or not the damage is easily accessible and if your roof’s integrity has been compromised.
If a tarp isn’t properly secured, it could move and pull away from the roof during high winds. It’s also important that the tarp doesn’t extend over the gutters or your home’s walls. These areas can trap water, causing additional damage and leading to leaks.
To prevent these issues, your roofing contractor will carefully assess your roof and surrounding areas before attempting to place the tarp. If necessary, they may use a ladder and safety harness to get to the damaged area of your roof. Once on the roof, they will carefully clear any debris, including shingles and nails, that are in the way of a well-placed tarp. They will also cover any holes in your roof, securing them with plywood sheets.
The roofing team will then take measurements to ensure the tarp is large enough to cover all of your roof’s damaged areas and overhang the peak by at least 4 feet on all sides. Depending on your roof, they may also screw an anchor board directly to the eave of your house. For extra support, they will sandwich the tarp between 2×4 boards and secure them with cap nails.
During this process, your roofing contractor will pay special attention to any roof features such as chimneys, plumbing vents and skylights. It is a safety hazard to leave these areas covered, and it’s likely that they will need to cut a hole in the tarp for these items.
You can also buy adhesive roof tarps that have a glue-like substance built in to stick to the shingles. This is a quick and easy solution, but it’s less secure than tarps secured with wooden boards and nails. In addition, it can leave residue behind on the shingles that will need to be removed during repairs.
Materials
When harsh weather leaves your roof damaged, a temporary fix is to tarp the area. This can minimize additional damage and provide you with a little breathing room before a professional roofing contractor can come out to tend to the roof repairs.
To get the job done properly, you will need a tarp that is large enough to cover the damaged area, 2×4 boards for securing the tarp, and a ladder. You should also use a broom to clear away any debris, like broken shingles, that could tear or puncture the tarp during installation.
Once you have the necessary materials, begin by measuring the size of the damaged area with a tape measure. This will help you determine what size tarp to purchase. You can also purchase a larger tarp to allow for any overlapping that will occur, especially on sloped surfaces.
A ladder should be used to reach the damaged area of your roof, but be careful not to overstep. If your roof is too steep, it is best to call a professional to complete the work rather than risk falling and injuring yourself. Once you have reached the damaged area of your roof, start to unroll the tarp from its corner. You may want to have a friend or family member hold the opposite end of the tarp for stability, especially if you are on a windy day.
If the tarp is not secured, it will shift and blow away during powerful winds or rainy conditions. To prevent this from occurring, you will need to secure the tarp with 2x4s that are spaced out evenly across the entire tarp. You can nail the 2x4s into the roof decking or, if you have access to a drill with a plastic cap, you can use screws instead. The nails or screws should be placed about 16 inches apart for maximum security.
If you do not have any 2x4s, you can also use sandbags or other weights to keep the tarp from moving or blowing away. However, using weights is not as secure as 2x4s and should only be used for a few days.
A tarp is a simple, affordable way to protect your home from serious water damage. However, you should always have professional roofers do a thorough inspection and perform the necessary repairs before laying a tarp on your damaged roof. To tarp your roof, you’ll need an appropriately-sized tarp and 2×4 wooden boards to anchor the…